Saturday 30 July 2011

Busy busy....

Sorry I've been quiet this week but I've been working on some new projects for Kaisercraft.

They've got 2 new ranges being released next week.... Miss Nelly and Hunt and Gather....and lots of new off the page items and embellishments too!

So I've been busy getting them done. I've finished 5 of my 6 projects... just got one more to do...

But something I can do is give you a couple of sneak peeks... but only if you're good... lol


Aren't they delectable!!!!

Sunday 24 July 2011

Winter...

As some of you are aware, after I finished my winter house for the set of music boxes, I decided I didn't like it... lol

So I've now redone it...


I liked the blue one I did for my niece, so went with the same colour scheme for winter...


And I did a little tweaking with the other houses and now I can say that I've finished the set completely!


I'm happy with the final result... what do you think?

Monday 18 July 2011

Our Family

It was a cold and wet weekend so I pulled out a Tim Holtz Configurations Printer Tray I had here and worked on that.
I really love the way it came and it's full of lots of little bits and pieces...


I love these as they are so flexible and you can have bigger spaces if you want, like I did for the title.

And of course with such a detailed project, there's lots of detail photos... lol


And with the boxes I didn't use in this tray and also the box, and the cover from the box, I can actually make a third one.
Will have to think on the them of it though!

Sunday 17 July 2011

Family memories

I'm back with the tutorial for my Blae and Ivy Family Memories photo display.

When I saw these papers, I thought I would do up a frame to hold photos of my childhood. I don't have a lot of photos, so the ones I have are fairly precious and these papers work beautifully with them.

So here we go....


Family Memories Display Frame

Products used: Six Frame Photo Display (SB2111); Blae & Ivy Paper Valley (P699); KC Black Paint (KC031); Blae & Ivy Clear Stamps (CS781); Blae & Ivy Journal Tags (JT623); KC Wood Flourishes Lampost (FL325), Leaves (FL303), Butterflies (FL341); KC Paper Blooms Iceberg (F630), Honey (F628); KC Pearl Flourish (PL515); KC Rubons Life (RB903), KC Mini Alpha (MA505); KC Lace (EM927)
Other products used: Embossing Ink, Embossing Powder, Hat Pin.


Glue the frame to the backboard and paint it black. When the paint is dry sand the top of the frame, including all edges to give them a slight distressed look.
Stamp leaves randomly around the frame with embossing ink and emboss with a gold embossing powder. I used a gilded embossing powder to give a distressed look.
Cut Blae & Ivy Valley into the separate pieces. Choose which pieces you want to use in the rectangles on the frame, trim, then distress and ink all edges. Glue into place.
Sand edges of your photos and decide on the placement. I inked the edges of 2 of the journal tags and used them in the 2 bigger frames, one behind the photo and the other behind the title.
When you’re happy with the placement of your photos stick down. I placed a quote in the bottom left hand frame.
Glue the lampost to the bottom left hand corner of the frame, and the leaf flourish to the top right hand corner of the frame. Add one of the pearl flourishes to the top of the leaf flourish. Add your title to the top frame, and finish with a pearl flourish under it.
Finish the frame off with pieces of lace and paper blooms and any other embellishments you might like to use.

And here are the detailed pics...


I hope you enjoyed... and don't forget to keep an eye on the Kaisercraft blog for more great projects from the girls in the design team!

More Kaisercraft....

As promised here is another creation for Kaisercraft. This is the Little Toot Train Frame. Loved this... so much fun! And perfect with more photos of my great nephew and his great grandfather.


Here are some closer pics...


I'm thinking I need to get more creative in the photographing of my off-the-page projects...

I'm going to be the first to admit, I'm not a card maker.
But I love these cards... I think they're nice and simple, but elegant, especially the Blae and Ivy ones.


I'll be back later with my last project for this month for Kaisercraft... the Blae and Ivy Frame....

Friday 15 July 2011

Little Toot

AS promised I'm here to share some of my projects for Kaisercraft this month....

Today I'm going to share some of my Little Toot layouts and cards.

I was so lucky as just before these papers arrived, dh's nephew decided to come to town and visit with his new baby boy, so the photos were perfect to match in with this collection.


And a couple of detail shots...


and my second layout...


Love this range of papers... and it works perfectly with little boys!


And a detail shot for this one...


Loved this paper range... it's great for little boys...

Thursday 14 July 2011

Loved it!


Took the boys to see the last Harry Potter tomorrow and loved it!
The effects were awesome! The boys loved it and I loved it... would definately go see it again!

Can't wait for it to come out on DVD now so we can have a Harry Potter movie marathon!!!


And on another note... I promise I will be back over the weekend and share the rest of my projects for Kaisercraft!

Tuesday 12 July 2011

Blae & Ivy Layouts

I loved Blae and Ivy... the soft blues and greens work perfectly with heritage layouts, especially wedding ones.

It worked even better when I went through my heritage photos and found these photos of my aunt and uncle's wedding... their wedding colour was soft blue and with the green background in the photo they were perfect!


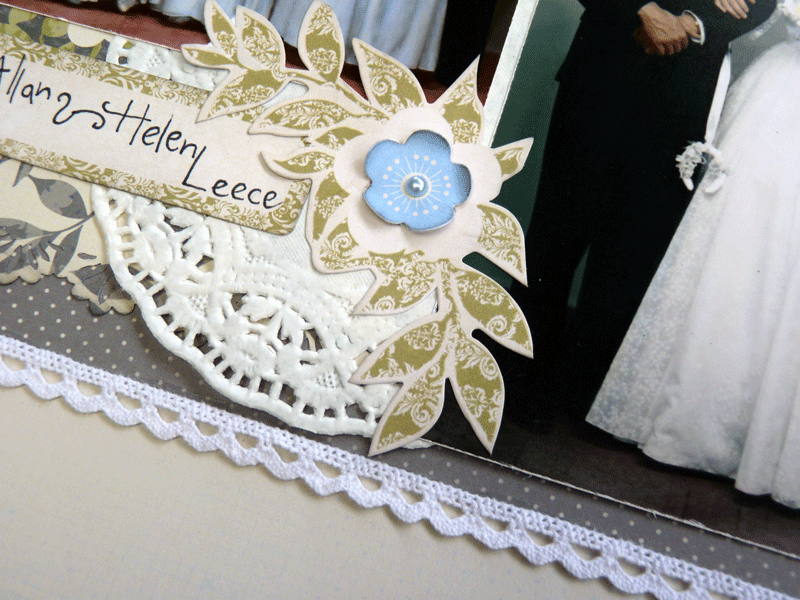
The flowers and leaves on the sticker sheet were perfect for these photos as well, and I curled the petals on the flower to give it some dimension.


Also you don't have to use a full sticker either, especially the journal ones. I trimmed the side off this one to use as a base for this detail...


Also in the Blae & Ivy range is a gorgeous diecut page with gloss flowers. This is such a pretty piece of paper, that I couldn't resist using it with a photo of my mum taken in around 1963.


To emphasise the diecut paper, I added some lace to the top right corner. Now I saw this on a layout on the internet a few weeks ago, but I can't remember where. So please forgive me for not acknowledging you.


Also included in this range is some gorgeous clear stamps. The leaf stamp is going to be perfect for a lot of projects I think... I always have trouble locating leaves to add to my flowers... won't have that problem any more!


Add a little bit of detail, lace and journalling tag and you have a simple and elegant layout!


But if you like my layouts, you really need to go have a look at the other layouts on show here...
http://www.kaisercraft.com.au/blog/starting-the-week-off-with-a-little-blae-and-ivy/

And if you click on the right on the kaisercraft blog link, then you will see lots more yumminess!

Sunday 10 July 2011

It's going to be a nervous week...

This coming week my first projects for Kaisercraft are being uploaded on the blog.
I wonder if I will have any fingernails left by the end of the week. It's funny, but you don't think of the pressure until it's you being the one on show.
This first one will be the hardest I think.
The past week has seen some gorgeous creations from Ann-Katrin, Hilde and Jodi. So if you've missed them head on over and check them out.

I have managed one layout this week. I had to set the challenge for the Challenge the Design Team. Of course I couldn't get away without doing the layout myself.
As I had forgotten about it (oops!), I set something easy... Non-person layout, Pattern Paper OVER a year old, and 3 things not made for scrapbooking!
So today I managed to get around to doing my layout.


This is a photo taken when we went to Carnarvon a couple of years ago. This was taken on our day trip out to the Kennedy Ranges.
So that takes care of the non-person layout, then the paper is from Heidi Swapp, and I'm certain I've had it for a couple of years.
And the non-scrapbooking items... buttons, staples and the tag.
Here's a closer look at the cluster...


So don't forget to check out the Kaisercraft blog for the projects from this year's design team.

Monday 4 July 2011

Off to England

In the next round of the Chookscraps Amazing Race!

So our criteria is...

-Colour blocking for cobblestone streets
-Large circle (more than 6 inches) for stone henge
-Number/s in the title to represent the tendency of the monachy to have numbers attached to their names
- It is cold in England so you need to be prepared to button up those jackets. Include at least two buttons on your LO.

So here's my layout...


I got my inspiration for this one from a Tim Holtz paper pad. All I had to do was cut out the squares....
Then I pulled out the sewing machine and stitched a big circle in the middle, and then decided to stitch a border.
And to bring the circle out I chalked it... worked perfectly!
I couldn't decide where to add the buttons, so thought I would just add them to the patchwork...

and here's a closer look at the title and sticker quote I used


Loving this layout....

Sunday 3 July 2011

Sneaks

I've just taken photos of my KC projects for the blog soon...

but thought I would share a sneak peek of one of them...


aren't I nice to share.... :o)

Saturday 2 July 2011

July Sketch

Time to go looky here...
http://www.blogger.com/img/blank.gif

The July sketch is up on the Kaisercraft Blog.

And one of the sample layouts is mine... so go have a look!

It's a great sketch and so many possibilities....