Sunday 26 August 2012

Birds on the wall

If you looked closely at the recent photos of my studio, you would have seen this new birdcage up on the wall.
It's the matching one for the one I did for Kaisercraft several months ago. I've used the same range of papers (Sweet Nothings), but this one is more the teals.


It's easy to add bling to your diecuts and also enhance the subtle patterns in paper using Kindyglitz....

I did find out when I put it on the wall that it won't hang straight with the bird stuck on... but then there's the wonders of bluetac! lol

I'm beginning to get my first classes underway. I've got the lesson notes all done, I just have to set a date. 
Of course, being the end of hockey season, relatives visiting, and not being well I'm trying to get it all juggled into place.
Hopefully I will decide the date shortly, but it looks like being the end of September unfortunately. If you're interested, drop me a line!


Sunday 19 August 2012

Cybercrop!!!

After months of not having time, this weekend I finally managed to spend time working on some challenges for a cybercrop at Chookscraps!!!
It really was wonderful doing a challenge for a change...

I managed to do the 3 layout challenges, with the theme being Billy Ray Cyrus.

So the first challenge had to contain mention of generations, string, wings and grunge or spatter.

I worked with this gorgeous photo of the current generation, taken in April!

The second challenge included torn paper, a clock or a prominent date, more than 1 person in the photo and something repeated.
And how could I resist but to do a male layout using this gorgeous photo of my boys!!!!

And the final challenge I did was to scraplift a layout from the Chookscraps gallery with a male in it.
I chose this layout of Sue-Maree's. And here is my version....
There's still time to do the challenges, so if you're looking for some inspiration head on over to Chookscraps!

On a local note, I'm starting to run some scrapbooking classes from home. So anyone local who's interested or knows of anyone who might be interested drop me a line.
I'm going to be running classes on a Friday night, and the maximum class size will be 6 so there's limited places. My classes will be mainly technique based.


Wednesday 15 August 2012

Yesterday, Today, Tomorrow

Remember the Prima birdhouse from the last post...
Well I had some of that gorgeous paper left over and it just called to me to create something with it - therefore this frame!!!

This is a Dusty Attic frame that I played with using the paper as a feature...
I learnt how to make the little crumpled roses in Hyden too and they're a lot of fun to make!


This was actually quite simple to do as the background is just one sheet of paper. The hardest part was the handcutting of the sunflowers....


Friday 10 August 2012

Little birdhouses

While I was taking photos of my studio I actually got around to taking photos of some projects here I've been meaning to share.
So watch out, there'll be lots of shares....

First up are these 2 little Dusty Attic birdhouses. I actually did them back in March or April when I was at the Hyden retreat.

This one using Kaisercraft Sweet Nothings papers was the first one I made...very soft and pretty!


Now when I looked through Karen's shop for something for the cornicing, I came upon a beautiful bright sunny range of papers from Prima called Sunkissed and just couldn't resist making another...


I must have known something as I had the perfect flowers on hand too. This birdhouse was missing the perch for the front, so I improvised and found a little twig the perfect size!!!!
  

Wednesday 8 August 2012

Studio Tour - Part 3

Onto the age-old question for a scrapbooker - how do you store your stuff?
WARNING: this will be pic heavy!
This is how I currently store all of my scrapbooking stuff - just remember for me it is constantly evolving. Some parts I love and they will continue to be stored that way... other's I'm still working on.

So onto the tour...
A scrapbooker's staple - my photos are all stored in photo boxes, by theme.
I have holidays, heritage (the 6x4's are in the tin), girls, enlargements, etc. I also have 1 box which holds my negatives and photos I'm not going to scrap.

 The boy's photos (6x4 and 5x7) are kept in this photo box I altered which is kept on display.
Now for embellishments...
My embellishments are stored in different ways - this first are flat containers which hold bulky items (containers of beads, ring binders, etc), items still on the packaging (resins, bling strips, etc), some chipboard I have lots of (label holders, chip words), and larger journal pages.
The containers stack nicely and don't take up a lot of room, though storing a lot of things.

I also have small embellishments stored in divided containers. These contain the tiny things like brads, tickets, charms, etc. Very easy to see what you have and what you want at a glance, but keeping them neat and tidy.
I also use the divided boxes for my ribbon. I'm sure you've all seen this before. I haven't changed this for years and I am really happy with it. Easy to choose exactly what shade/colour ribbon I want for a project!
I do have some bulk items for scrapbooking, especially after my stint on the DT for Kaisercraft. They are all stored in these boxes. One is empty so don't think everything is full... lol
Rub-on's and Diecuts...
For me, these have been an on-going change. I am never happy with what I've got, but now I think I might actually be onto something. I have them all sorted into themes, sorted by rub-ons and diecuts (also tags) and stored in A4 plastic document folders. It puts no pressure on the rub-ons and being sorted by theme, it's easy to find what I'm looking for.
I keep all of my paper stored in Cropper Hopper vertical files. I'm not sure if you can get these any more (well definately not the black ones....) and paper is sorted by cardstock (by colour) and pattern paper. Pattern paper is sorted into manufacturer and then further into ranges. As I will usually use a full range when I scrapbook it makes it easier.
All of my scraps are stored in a tub, and also my 6x6 paper pads. The paper pads I'm happy with, the scraps not so much! I also have kits, 12x12 pads, chipboard sheets and paper the kids can use stacked next to it.
Alphabets are all stored in tubs... thickers in one, smaller alphas in another and the rest in 2 other tubs....
My loose chipboard alphabets are all stored in Kaisercraft drawers sitting on the top of my shelves.. Love these! And it's a great way to mix and match alphabets.
Chipboard is stored in a couple of ways. Sheets of grungeboard and also chipboard pieces are kept in tubs...this is still very much a work in progress until I find something better.
Though all of my loose chipboard pieces are again stored in the Kaisercraft drawers, sorted by shape.
Though anything larger than this has been stored into another set of drawers. Originally it was meant to be 3 drawers across, but I joined them up to make long drawers to store the longer pieces of chipboard
Stamps....
All of my clear stamps are stored in the A4 document folders again, stuck onto laminated sheets. All of my wooden stamps are stored in a box, including the Kaisercraft ones I haven't sorted out yet. I also have a book I need to stamp so I can easily see what stamps I have when I'm looking for one.
Paints, mists, colourwashes, stains and stickles, etc (all that messy stuff!)
This is only new for me... before I've had them stored into a trolley I could pull out, but I wanted them within easy reach. So I sorted them by type and colour, and stacked them on the top of the Kaisercraft drawers. To lift the back bottles slight so they could be easily seen, I 'borrowed' a couple of pieces of square 40x40 (I think) timber from the husband and used it as a step. Works beautifully and raising the bottles enough. And you have to admit... it does look pretty!
I have another set of drawers, this one is the smaller drawers. This one holds all of my Tim Holtz (and some other) bits and pieces all nicely sorted...actually a lot of stuff I would use for off-the-page!
Flowers...
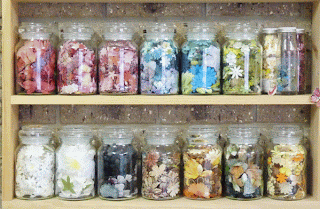
By now most of you know how I store my flowers... all in old coffee jars, sorted by size and colour. They do look so pretty on the shelf on my wall.
Joining them are jars of buttons (colour themed), jars of lace and string. There's also a jar of mixed pieces of ribbon (the 5-10cm bit always left!).
I've also hung a piece of dowel to hold my decorative tapes.

Ink pads are a sore subject for me... I still haven't found a storage solution I like. But I have stored all of my Versacube inks in this metal basket I picked up...

Well there you have it... not perfect by any means and there's still things I'd like to do.
My storage is always evolving. I hope you found some ideas there, but what works for me might not work for you!


Sunday 5 August 2012

Studio Tour - Part 2

Yesterday I gave you an overview of my studio... today I'll give you a closer look at some areas.
Most of my room has been done on a budget and I've looked around for the cheapest way of getting the looks I wanted.
All of the bookcases and the cubes I have purchased from Red Dot (our local cheap shop) to keep the costs down.
The lino floor was purchased as an offcut from our local store so I got it for half price.

My computer desk. Now this is made from a set of white drawers (had on hand and just changed the handles), 2 pieces of white melamine (1 for the desktop, and the other for the back) and 2 legs. The front of the melamine top has been finished with a piece of pine trim. It's the perfect size and the drawers hold my A4 paper, inks and pens.
I've put a couple of screws on the side to hold the powerboard in easy reach.
I thought I would share this little tip... I've put on hook in the side as well and the cords I use to charge my phone, e-reader and the cord for the external hard drive clipped with bulldog clips and hung off the hook. They're kept neat and tidy and within easy reach.

This is a closer look at the set of cubes that hold several things on display like boxes and mini albums.
The top provides a good place to display a frame, and hold the wire basket I picked up that holds all of my Versacube inks. I used to have them all sorted by colour, but decided to just throw them all in together.
I have a simple matchstick bamboo blind at the window with white organza curtains framing it flowing down to either side of the set of cubes. It keeps a nice soft look to the room against the brick walls.

I love these bookcases. I picked up several from Red Dot (as well as the cubes) and keeping them all white they add a freshness to the room. I've also teamed them up with some cane baskets from Target.
This set of bookcases hold my books on scrapbooking, my cross stitch kits and sewing stuff all on the baskets.
And this one holds my Stamp-it, Tim Holtz and Staz-on inks, as well as Kaisercraft paints, watercolour pencils and glues. I'm not 100% happy with this so consider it a work in progress. I want something for the inks that will make them easier to access...
BTW the basket holds clothes that I use for various clean-up jobs...

I also have another of these 2 shelf book cases that has 2 baskets in it. One is empty but the other holds all of my spare tapes, inks and sanding blocks.

I will be back in the next day or 2 with my scrapbooking storage. Warning it will be a long post as I'm going to go into it in detail...

Stay tuned!